
UltimateInput
A downloadable UltimateInput
Input Manager for GameMaker
With this asset you will be able to generalize the input checking in your game. Instead of hardcoding the keys in your game, call for an associated keyword defined by you.
Fromkeyboard_check(vk_up) || gamepad_button_check(gp_padu)toInput.Check("Up").
Also this asset lets you group your inputs into profiles for different players or playmodes. Perfect for local multiplayer.
Fromif (player == 0 && keyboard_check(vk_up) || player == 1 && gamepad_button_check(gp_padu))toInput.SetProfile(playerProfile); Input.Check("Jump");
This asset implements an extended series of input check types such as Double Press, Repeated Press and Long Press.
Using this manager you will be able to add to your game keys redefinitions without complicating your code anymore.
For a better formatter description visit the github repo.
What does it do?
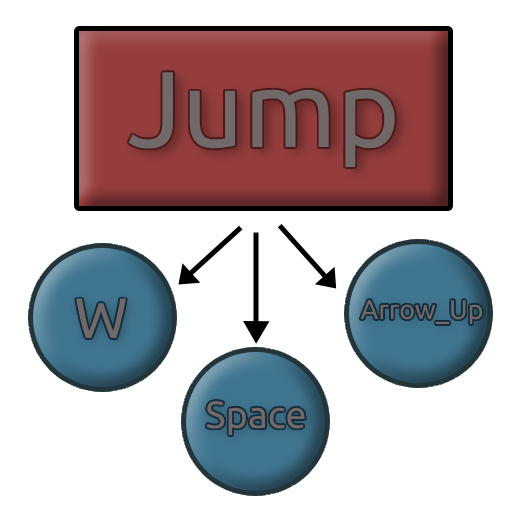
The main objective of this asset is to avoid hardcoding the keys used on your logic. Let's say your character can jump and it can happen with either W, Space or the Up Arrow. On regular GameMaker to check if the player wants the character to jump we should do something like:
if (keyboard_check_pressed(ord("W")) || keyboard_check_pressed(vk_up) || keyboard_check_pressed(vk_space)) {
    Jump();
}
We want to avoid this for two reasons. First this is less maintainable, given the moment you decide you dont want to jump anymore with space you will have to change everywhere on the code where you control if you should jump. Second the system I propose makes it easier to implement configurable inputs in your game.
With UltimateInput the previous code would turn into just:
if (Input.CheckPressed("Jump")) {
    Jump();
}
Ultimate Input binds N keys into a string that is more related to what the code is doing. This is what we call an InputInstance.
Apart from this, you have a series of extended input types.
Input Types
Base gamemaker can check regular inputs, pressed inputs and released inputs. On Ultimate Input we can check the following events for an input:
- Regular check: The check is true for every frame the key is hold down.
- Pressed: True only for the very first frame is hold.
- Released: True for the frame after the moment we stop holding the key.
- Double: True if we double tap the key (the time between taps is configurable).
- Repeated: While the key is down it will return true every N milliseconds. Can be used for example to move on menu items.
- Long: While the key is down first it will be false until N milliseconds where it will be true for the rest of the time that the key being held down.
- LongPressed: Like before when you press you have to wait for a bit before its true but here only for a frame.
- LongReleased: Like before you have to hold for a while before releasing. If you tap and release very fast it won't count.
- RepeatedLong: Again a check with some Ms of buffer before it starts behaving like Repeated.
- Value: For analog keys that can range between 0 and 1 (Gamepad sticks) this returns the value.
What are Profiles?
The term "Profile" refers to a collection of input instances under a name. As an example, you can have two Profiles called "Keyboard" and "Gamepad". Either have the same inputs "Up", "Down", "Left" and "Right" but the keys binding will be different. Other example is having a Profile for Player1, another for Player2, etc... Coding the game will remain the same since you check for inputs related to your current Profile.
InputManager General Structure
Finally, adding Keys, Instances and Profiles we have the InputManager of UltimateInput. When you print the InputManager (The toString() function is overloaded) you will see on the console something like this:
NOTE: The bool next to the instance indicates if any of the associated keys is being pressed.
Using Ultimate Input
The next section will cover how to practically use UltimateInput. From setting up the InputConfiguration for your game to instantiating the manager on your controller object.
Getting the Asset
You can download the latest release through the following link.
You can either get the package (.yymps) and import it on your project dragging the file into the IDE or clicking at ( Tools > Import Local Package) or importing the whole project (.yyz) with Import on the Start Page of game maker.
Asset Overview
Once you find yourself with a project with the Ultimate Input Asset you will see two folders: UltimateInput by MayitaMayoso and UltimateInput Using Example.
The first folder contains the essentials to make Ultimate Input work in your project. If you know how to use the asset this is the only elements that you need to import.
- InputManager (Script): Contains the InputManager struct. It is the object that controls all the input. Contains a series of InputProfiles.
- InputProfile (Script): Contains the InputProfiles struct, a collection of InputInstances.
- InputInstance (Script): Contains the InputInstance struct, which represents an action in your game and stores a collection of associated InputKeys.
- InputKey (Script):
- InputConfiguration (Script): Here is where you define the keys that you will use in your game.
- InputGlobals (Script): InputGlobals holds the required macros, enums and global variables to manage UltimateInput.
- InputHelpers (Script): A series of functions that are used to manage UltimateInput.
- ComponentParent (Script): This asset is part of a bigger setup I use for my games where I have other managers such as CameraManager, TimeManager, GeometryManager, etc... Including this file is just for compatibility in case of publishing my other assets.
UltimateInput Using Example is a very basic game to show how to set up teh asset to make it work. At the day I'm writing this readme, this just consists on a blob moving around. Use the space key to switch between a WASD movement to an Arrows movement. Take care of the following elements.
- System (Object): This is your System/Controller/Game/Manager/Everything object that just uses its own events to call the InputManager. This Object needs to create the InputManager, Load the Configuration, call StepBegin() and call DrawGuiEnd() of the Input in order to update the status of this.
- TestRoom (Room): Not a lot to say about this asset. Just to make very clear that the System object has to be created before any other object that you might want to use the Inputs with.
- TestObject and TestSprite (Object, Sprite): The blob that moves around. Press space to change which keys are used to control it.
Setup the InputManager in your project
As you can see on the System object from the example I give you, in order to work, the InputManager needs you to the following:
A create event where you instantiate the struct and define the macro Input.
// Create an instance of the input manager
inputManager = new InputManager();
// Bind the input manager to a macro so we can avoid calling System making it less verbose
#macro Input System.inputManager
A begin step event to update the inputs
// Update the input manager
// This call has to be on begin step in order to be updated before anything else.
// Also be sure to create this System object before any other object so this is called always first.
Input.StepBegin();
A draw GUI end event to update some globals
// This event is executed on DrawGuiEnd Event so we make sure it happens after every other object logic.
Input.DrawGUIEnd();
NOTE: I prefer to implement InputManager as a struct instead of an object since it is part of a bigger collection of managers on my personal project and I assume it will probably be the same with you.
How do I configure my game Inputs
This is the example that comes on the project on how to configure the inputs for your game.
function InputConfiguration(LoadFromDisk = false) {
    // Delete the time source that has called this function
    time_source_destroy(Input._InputConfigurationCallbackTimeSource);
    // If there is a previous configuration load it and skip all these steps
    if (LoadFromDisk && !Input.Load()) exit;
    // Default
    Input.AddProfile("Default");
    Input.AddInstance("SwitchMode");
    Input.AddKey("SwitchMode", KEY.SPACE);
    // Player 1
    Input.AddProfile("Player1");
    Input.AddInstance("Up");
    Input.AddInstance("Down");
    Input.AddInstance("Left");
    Input.AddInstance("Right");
    Input.AddKey("Up", KEY.W);
    Input.AddKey("Down", KEY.S);
    Input.AddKey("Left", KEY.A);
    Input.AddKey("Right", KEY.D);
    Input.AddKey("Up", KEY.UP_ARROW);
    Input.AddKey("Down", KEY.DOWN_ARROW);
    Input.AddKey("Left", KEY.LEFT_ARROW);
    Input.AddKey("Right", KEY.RIGHT_ARROW);
    // Player 2
    Input.AddProfile("Player2");
    Input.AddInstance("Up");
    Input.AddInstance("Down");
    Input.AddInstance("Left");
    Input.AddInstance("Right");
    Input.AddKey("Up", KEY.LEFT_JOYSTICK_UP, 4);
    Input.AddKey("Down", KEY.LEFT_JOYSTICK_DOWN);
    Input.AddKey("Left", KEY.LEFT_JOYSTICK_LEFT);
    Input.AddKey("Right", KEY.LEFT_JOYSTICK_RIGHT);
    Input.AddKey("Up", KEY.PAD_UP);
    Input.AddKey("Down", KEY.PAD_DOWN);
    Input.AddKey("Left", KEY.PAD_LEFT);
    Input.AddKey("Right", KEY.PAD_RIGHT);
    // Save all the profiles
    Input.Save();
}
From this code we can extract the following points:
First, the configuration is enclosed on the function InputConfiguration(bool) withing the script of the same name. This function takes a boolean value as an argument. This argument indicates if the configuration should be loaded from disk (The name of the file is stored on the macro _INPUT_CONFIGURATION_SAVEFILE by default "InputConfiguration.data" and it will be stored on the gamemakers save directory). Lastly at the end of the function we call the function Input.Save(), it will store the defined configuration on the previously named file. Note that if we DO load the configuration, the function will terminate just after the load and nothing else will be defined, be really careful with this
Define a Profile with Input.Profile("ProfileName"). This step is not mandatory since the "Default" profile will always be created. If not given any other profile, every input will belong to here. When defining a profile under a string, every instance and key you create will be under this collection.
Define an Instance with _Input.AddInstance("InstanceName" [, long_press_time, double_tap_time, repeated_taptime]). This function registers on the current profile an instance. The first parameter is the name of the instance. The three following parameters are optional and they define the behavior of the long press, the double press and the repeated press. The default value of these parameters can be defined on InputGlobals.
Define a Key with Input.AddKey("InstanceName", Key[, device=-1]). This will add to the defined instance a key (checkout the enum KEY at InputGlobals to see every supported key). The third parameter (which is optional) is device. The default value of this parameter is -1. This only affects when the key is a gamepad key. Since we can have up until 12 gamepads if my memory is no lying to me, you can specify which gamepad key from which of the available spots. Note that if the device is -1, it will search for the first enabled gamepad which I recommend.
Credits
This project was built on a couple of weeks during summer 2019. Born heavily inspired by the Juju Adams first Input Manager (The one that came before the current Input).
If it took me two weeks to build the majority of the code for UltimateInput, it got me from 2019 to 2024 (🔥💯🗣) to battle up the laziness to write down a documentation and pack it up on a git repo.
Licensing
This project is protected under the MIT license.
Download
Click download now to get access to the following files:

Comments
Log in with itch.io to leave a comment.
Esto es realmente estupendo, con esto podemos crear diferentes controles, crees que haya alguna forma de hacer que el jugador pueda editar los inputs?
Con los setters y los getters de la librería podrías hacerlo pero tiene que hacerse un poco a mano! Hay funciones para escuchar que input está utilizando el usuario.